Where do I schedule a live stream?
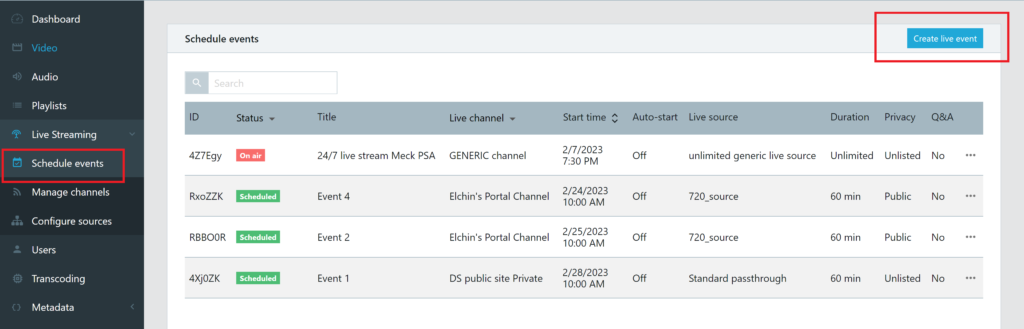
You can schedule a live stream by selecting the Schedule events menu item found in the Live Streaming menu in the admin portal. This opens the list view which shows you all scheduled, running or expired events. Click on the Create live event button to begin the process of scheduling your live stream.
How do I complete the Create Live Event form?
The Create Live Event form has several sections that help you add information about your live stream, where it will run and what will happen to it after completion. A few fields are mandatory. As you can imagine, the title, stream time and date and publishing information are mandatory. The rest is optional and can be edited later after you’ve scheduled your event.
Tell your viewers about your live event
Title. This field is mandatory. It has a 100 character limit.
Description. This field is optional and has a 500 character limit. You can style your description using markup and emojiis. Please see this article for more information: 😺 How to create engaging video descriptions 😻
Organization. This selection is optional. The organization list is managed in the Metadata section of the admin portal. If your organization is not found in the list, go to Metadata > Metadata fields and find the metadata field called Organization. Open this and add your organization to the list of prepopulated values.
What are you streaming and where you will publish it?
Channel. This is where the live stream will be published. Just like on television, where a program appears on a channel, your live stream will appear on your selected channel. Channels has properties, so select the channel that matches your requirements.
Live source. This is the source of the live stream for the player. You can stream from Azure Media Services (AMS) or from another source that produces a .m3u8 playlist URL (this is called a generic source). The live source will be prepoulated based on the channel you select, but you can override this channel and select a different live source. Just be aware that you can’t double book a live source. If it is already scheduled to run an event at your selected time, you can’t schedule your event on it.
Schedule your live event
Start date. This is the day based on your local machine’s clock.
Start time. This is the event start time that you will advertise to your viewers. On the channel’s live event page, your stream will display this time and date.
Time zone. This will default to your local machine’s time zone. You can change it if necessary.
Duration. This is the expected duration of your live stream. It is used for scheduling and reserves the channel and live source for this amount of time beginning at the start time of your event.
NOTE: It does not automatically stop your event. If your event runs longer, no need to worry.
Uploads
Event thumbnail. You can upload a thumbnail that will be displayed as the splash image in the player, as the thumbnail in the channel guide and also as the VOD thumbnail if the stream is recorded. The aspect ratio is 16:9 and the maximum size is 10MB. Just remember, a 10MB file may slow down the page load for users with low bandwidth.
Agenda. If your event has an agenda, you can upload it here. It will be displayed on the channel live event page for your viewers. The file should be a pdf and the max size is 25MB
Automatically start streaming
This is an optional section that gives you the ability to start the preview and/or go live automatically at a preset time before the scheduled start of the live stream. This is useful when your encoder is already pushing the contribution feed to the ingest URL.
Start preview before scheduled event start time. This will start the Azure Media Services streaming server and create the streaming URL for the preview player in the control room. The preview streaming URL is a different URL than the live streaming URL.
Go live before scheduled event start time. You can set the offset up to 60 minutes before the scheduled start of the live stream. When this time is reached, the player will receive the live streaming URL and your viewers will be watching your live stream.
Post production settings
These settings affect what happens to the live stream after it’s finished.
Enable immediately. This means that the recorded live stream will be published immediately after the live stream is over, and it will be viewable as a VOD. Before the encoding is complete, the video will be streamed from the live archive (used for the DVR functionality) and when encoding of the live archive is complete, the stream will be using the MP4 versions.
Generate captions. Selecting this will add automatic caption generation for the VOD to the processing pipeline. When you select this option, you need to select the language of the audio track.
Do not convert to VOD. This will prevent the creation of MP4 files from the live archive. The live stream will still be playable after the stream is finished, but it will be streamed only from the live archive and not from the MP4 versions. This is useful for cost control or when you don’t need to have MP4 files for download and other purposes.

