
Content
If your organization has a content retention policy, you can apply it to the media portal in two ways.
- You can set a predefined expiration period for all uploaded media items
- You can flag items for indefinite retention.
Setting the predefined expiration period
The first step to setting the expiration period is activating the retention policy. Once the retention policy is turned on, you can set the expiration period, and it will be applied to all items uploaded from this point forward. The expiration period is defined in days, so if you want all items to expire one year after uploading, you would enter 365 in the expiration period field.
When the expiration policy is active, the expiration date is automatically set in the “Expires on” field and cannot be changed by the owner or administrator.
What happens when a media item expires?
When the expiration date is reached, the media item will be soft deleted automatically, and the user will receive an email notification that the media item has expired and has been deleted. The deletion action will be written to the logs and database for auditing purposes. The item will remain in the deleted status for 30 days, and during this time there is the possibility of restoring the item. 30 days after deletion, the item will be purged from storage and the event will be written to the logs and database for auditing purposes.
How do I activate the custom expiration policy?
Contact Ravnur Support to have a custom expiration policy turned on for your vCMS instance.
What is a retention flag?
If you need to keep a media item indefinitely and make sure that it does not get deleted, you can flag it for indefinite retention. Selecting “Retain item” blocks all manual and automatic deletion processes in the vCMS.
How do I activate the retention flag feature?
Contact Ravnur Support to turn on the retention flag feature. Once it is activated, administrators with the “set retention flag policy” permission in their role will be able to flag and unflag media items for indefinite retention.
How to flag or unflag a media item for indefinite retention?
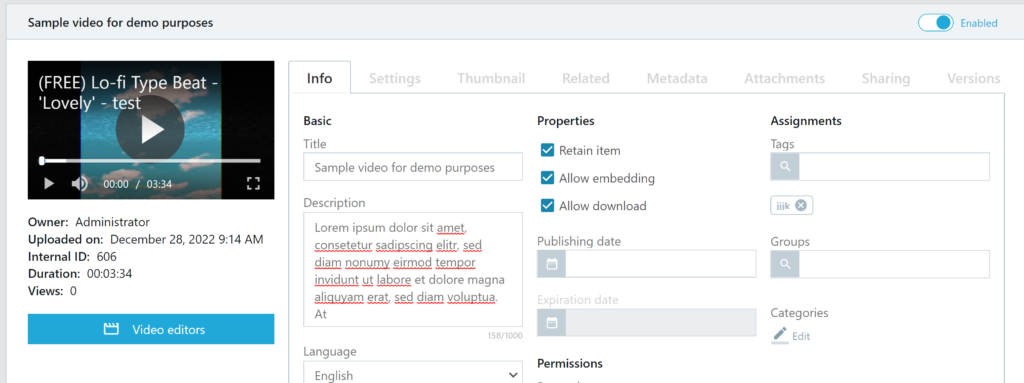
This feature is managed on the media item’s details page in the admin portal. An administrator with the permission “set retention flag policy” in their role will be able to select or deselect the checkbox “Retain item”. When this box is checked, the expiration date field becomes inactive and any previously set expiration date is deleted. This also overrides the expiration policy discussed above.
Bulk editing of the retention flag
In the video and audio file list view you can set or remove the retention flag for multiple media items using the bulk actions function. Just select one or more items and click on the bulk actions drop down menu to select either “Set retain item” or “remove retention flag” and then select “Submit”. You cannot set the retention flag on items already flagged or items that have been deleted.
How can I see what is flagged for indefinite retention?
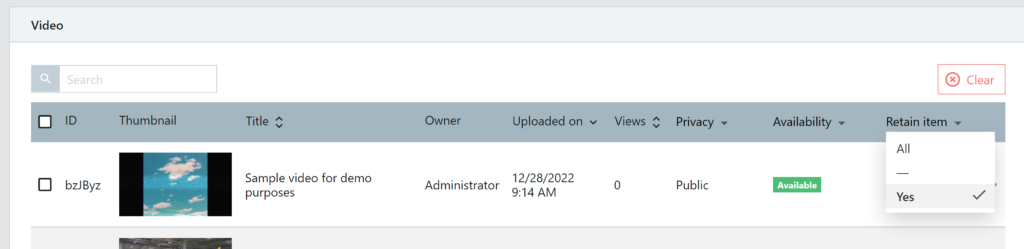
The list view for videos and audio files in the admin portal has a column labeled “Retain item”. Clicking on the header of this column opens a filter where you can select “Yes” to filter the list of media items so that only flagged items are displayed.
Who can flag or unflag a media item?
An administrator with the permission “set retention flag policy” in their role will be able to select or deselect the checkbox “Retain item”.

