
A live source is the source of the video stream displayed in the player. It comes from the streaming server (origin server) and you can set up multiple live sources for your application. The number and type of live sources depend on your requirements.
When would I need more than one live source?
- If you run concurrent live events, you’ll need more than one live source (one for each live event).
- If you want to use cloud encoding for a live event, and passthrough for another event, you’ll need two different live sources.
- If sometimes you want to stream from an Azure Media Services (AMS) origin server, and at other times from a non-AMS origin that produces a .m3u8 playlist manifest URL, you’ll need two types of live sources.
- You have difference stream latency requirements for your live events.

How do I create a live source?
In the admin portal go to Live streaming > Configure sources. Click on the blue button labeled Create live source in the upper right corner of the list view.
Step 1 – Select the type of live source
The first step in creating a live source is selecting the type of live source. There are two types: Azure Media Services and HTTP live stream URL, also referred to as a Generic Live Source in the application.
- Azure Media Services. This is the primary live streaming service used by the application. Using AMS allows you to control the settings of the streaming server and the post-production pipeline. For example, the AMS live stream is automatically converted to a VOD asset that can be managed by the vCMS.
- HTTP live stream URL. This is the generic live source. If you have a .m3u8 playlist manifest URL, you can create a live source that will use this URL and send it to the player. This is useful if you are streaming from a non-AMS streaming server or a CDN. NOTE: you must use a https URL.
Step 2 – Main settings
This screen allows you to select the parameters for your live source. The parameters inside the blue box cannot be changed after creation, so you may want to create multiple sources to meet your needs. For example, you may want to use Standard Passthrough as an encoding option and also be able to use the Premium 1080p encoding option at times. In this case, you would create a live source and select Standard Passthrough, and then create another live source that uses Premium 1080p encoding. This will allow you to select the appropriate live source when you create your live event.
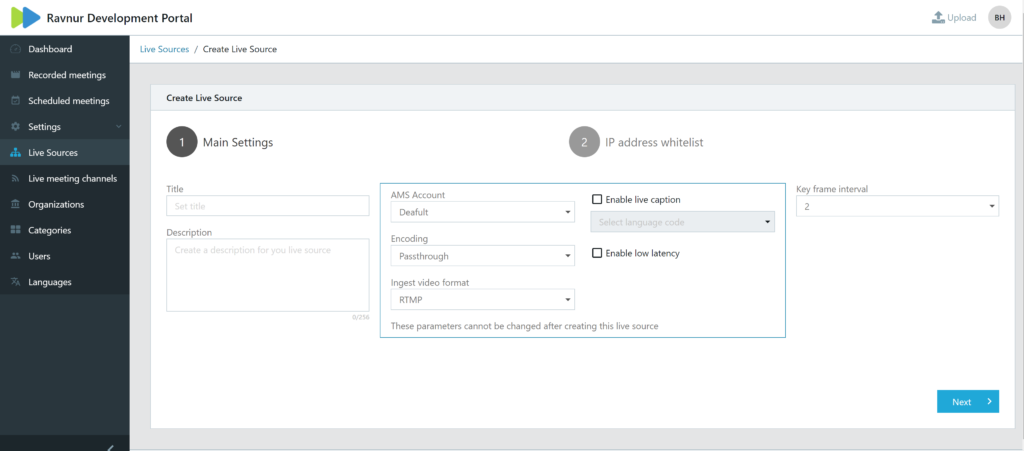
- Title. The title is displayed in the list view and in the drop down lists on the create/edit channel and create meeting pages. Therefore, it’s important to give it a descriptive name (e.g Channel 1 – cloud encoding).
- Description. The description is found only on the live source details page and is used to give the user more information about the live source. For example, “Used for City Council meetings. No live captions. Standard latency.”
- AMS Account. Select the appropriate Azure Media services (AMS) account. In most cases you will have only one AMS account. However, if you plan on streaming from different geographic regions (e.g. some meetings take place on the east coast and some on the west coast) you would want to have an AMS account in each region to minimize the ingest distance. If you need additional AMS accounts, contact Ravnur support.
-
Encoding. You have two choices, Passthrough or Cloud Encoding, and each type has two versions. The price varies among the encoding types – see the Azure pricing calculator for current rates.
Basic Passthrough – the least expensive option. An on-premises live encoder sends a multiple bitrate stream. The basic pass-through is limited to a peak ingress of 5Mbps, up to 8-hour DVR window, and live transcription is not supported.
Standard Passthrough – An on-premises live encoder sends a multiple bitrate stream. The standard pass-through has higher ingest limits (up to 20Mbps), up to 25-hour DVR window, and support for live transcriptions.
Standard 720p – An on-premises live encoder sends a single bitrate stream to the Live Event and Media Services creates multiple bitrate streams. If the contribution feed is of 720p or higher resolution, the Default720p preset will encode a set of 6 resolution/bitrate pairs
Premium 1080p – An on-premises live encoder sends a single bitrate stream to the Live Event and Media Services creates multiple bitrate streams. The Default1080p preset specifies the output set of resolution/bitrate pairs. - Ingest video format. There are two types of streams you can send to a live source: RTMP and Smooth (fragmented MP4). Most encoders send RTMP and RTMP is the default setting. Contact Ravnur Support if you need to activate fMP4.
- Enable low latency. Selecting this option changes the key frame interval from 2 to 1 and reduces stream latency from around 25 seconds to around 7 seconds for HLS output. The most resilient stream is the standard latency stream because it buffers more of the video and should be chosen when there is no need for lower latency. However, if there is viewer interaction such as Q&A, then low latency is a better choice.
- Enable live captions. (not available for Basic passthrough) Selecting live captioning sends the audio to the Azure Media Services transcription service and adds real-time captions to the live stream. These are machine generated, so they are not perfect, and they will be affected by background noise or music and speakers talking over each other. Select the language of the audio track to inform the service of the language spoken.
- Key frame interval. Default setting is 2. When using low latency, this changes to 1.
Step 3 – IP Address Whitelist
The input to the streaming server can be restricted to a specified IP address, range of IP addresses or CIDR range. Default is set to allow all IP addresses.
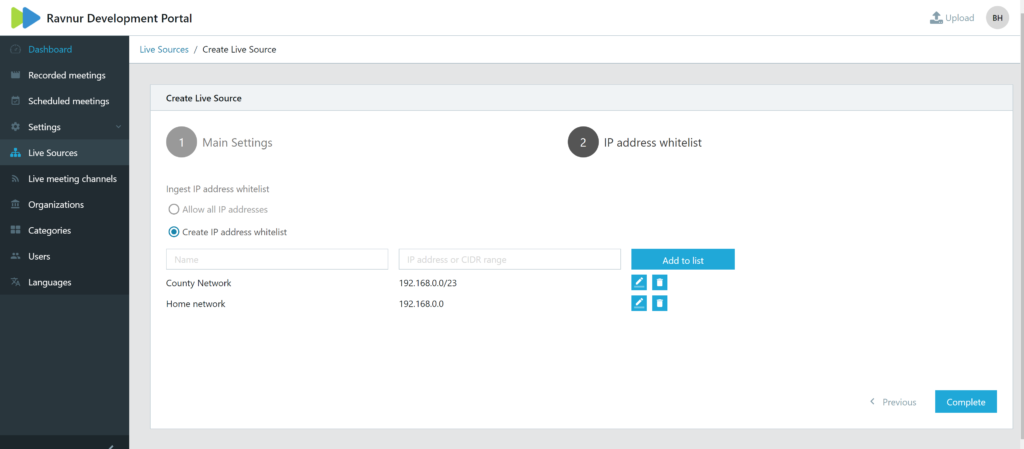
How do I configure the IP address whitelist?
Click the Create IP address whitelist radio button and enter:
- Name – this is a description of the IP address, such as City Hall Network.
- IP Address or CIDR range – enter the corresponding IP address or CIDR range
After the IP whitelist configuration has been reviewed, click on Complete to create the live source. It may take a minute or two for Azure Media Services to provision the channel and return the response.
Once the live source has been created, you will have two sets of ingest URLs comprised of a primary and a secondary ingest URL for the RTMP and RTMPS streams that you can enter into your encoder. It’s best to use both URLs to protect against stream issues.

