Content
Live streaming with the Ravnur platform is a simple affair. Once the prerequisites are in place, it’s a simple click of the Go live button and you’ll be on the air. Below you’ll find a list of tasks required to go live.
- Schedule a live event. This creates the program on the channel that you’re streaming to. Even if you want to start an ad-hoc stream (i.e. an unplanned event), you’ll need to schedule the live event so that the channel knows what’s playing. Please see this article for more about scheduling a live event.
-
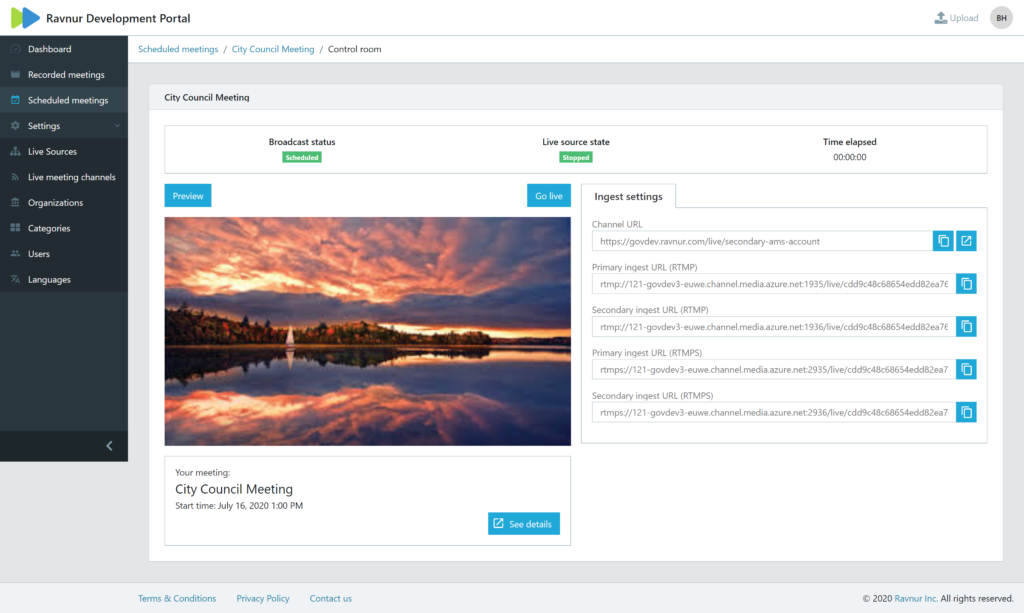
Set up your encoder. There are two parts to encoder set up. The first part covers the encoder settings such as bitrate, keyframe interval, etc. You can read more about encoder set up here. The second part is specific to the channel and that is the ingest URL. Azure Media Services provides RTMP and RTMPS ingest points, each with a primary and a secondary ingest URL for your encoder. We recommend using both to improve the resiliency of your stream. The ingest URLs are shown in the control room page for the channel, and they are also found on the Live source’s details page (Live streaming> Configure live source). This is an example of an ingest URL:
rtmp://18-xxxxxxxx.channel.media.azure.net:1935/live/xxxxxxxxxxxxx9f508520bd032602
How do I find the Go Live button?
It’s in the Control Room for your live event.
- Open your scheduled live stream by clicking on it on the Dashboard or in the list view of the Schedule events page.
- Click on the blue Go to control room button on the left side of the live event info panel
- In the Control room, you’ll find the button to preview your stream as well as the button to go live. There is also information about the status of the channel, meeting details and a link to the event page on the channel where the live event is scheduled.

Starting the live source
If you’re streaming directly from your encoder to AMS, you’ll need to start the steaming server (live source) by clicking on Preview or Go live before you send data from your encoder to the channel. Azure Media Services is not an “always on” service, which means that you’ll need to start the live source before you can send your stream to the live source and see your contribution feed. When you click on Preview or Go live, you are actually spinning up a streaming server, and that’s the reason why you may get a “Cannot connect to server” error in your encoder if you try to send data to it before AMS is ready.
Attention please! You must start the preview or go live BEFORE connecting your encoder to the live source. Also, do not let the channel run for more than 15 minutes without input from your encoder or the streaming server may become unstable.
There are two ways to start the live source. You can click on Preview or Go live. Both will start the live source.
Previewing the stream
Clicking on Preview starts the live source. It takes about 10 to 20 seconds for the live source to start and become ready for input. In the header of the control room, you’ll find the Live source state. It will change from Stopped to Starting and finally to Running when it’s ready for data. In the player you will also see the message “Waiting for stream data” when the live source is ready to receive your encoder data.
Preview does not send the stream to the public. The stream is visible only in the control room. This allows you to verify that the stream is stable, and your inputs are correct. During preview, the stream is not being recorded and the streamed content will not be available in the DVR feature.
Go live
When you’re ready to go live, click the Go live button. Your preview will disconnect, and the player will stop showing the preview stream. But don’t worry, this does not mean there is an error. It can take up to one minute for the live stream to start, although 30 seconds is normal. Despite this temporary interruption, the live stream will begin at the point when you clicked on Go live, and recording of the live stream begins at this point as well.
The player in the control room will show the stream that the public is seeing on the public channel page.
Stopping the stream
When you are done with your live stream, click on the End live stream button. At this point the recording of the stream will stop. As long as the viewer does not refresh the page, the viewer can continue to view the stream by using the DVR feature. The Live source state will change from Running to Stopping and finally to Stopped.


